Combining Laser Photo Engraving and CNC Scribing in One Project | JANUS Tutorial
- Redt Inc.

- Jun 22
- 2 min read

combining-laser-photo-engraving-and-cnc-scribing-in-one-project-janus-tutorial
One Setup. Two Processes. New Creative Possibilities.
In this tutorial, we'll show how to create a custom photo-engraved pendant using JANUS.
Traditionally, laser engraving and CNC machining have been performed separately. JANUS combines both technologies in a single workflow, allowing photo engraving and precision machining to be applied to the same project.
This integration enables new design styles and creative possibilities that were previously difficult to achieve.
Let's see how it works.
Step 1. Import the Artwork
Import the image you would like to engrave and adjust its size and position.

For the best engraving results, we recommend using high-resolution images whenever possible.
Step 2. Create the Laser Photo Engraving Toolpath
Use the Image Toolpath function to generate the laser engraving toolpath.

The preview allows you to verify the engraving result before processing the actual material.
This reduces trial-and-error and helps ensure consistent quality.
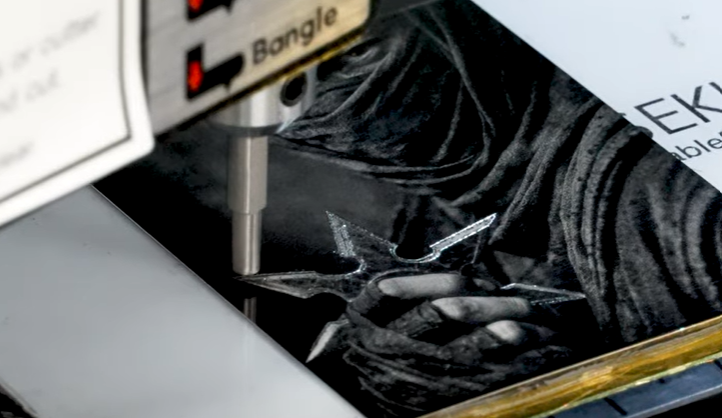
Step 3. Create the CNC Machining Toolpath
Select the contour to be machined and generate the CNC toolpath.

Step 4. Arrange Both Processes in One Project
Both the laser engraving toolpath and CNC machining toolpath are displayed within the same project.
The processing sequence can be reviewed and adjusted before starting the job.

Step 5. Start Processing
Once the job starts, JANUS automatically performs the laser photo engraving process first, followed by CNC machining.
No additional setup or repositioning is required between operations.
Watch the Full Tutorial
Watch the complete process in the video below.
Need help choosing the right machine and accessories? Let Redt Inc. help you decide.
Every manufacturing process is unique. Depending on your application, the ideal solution may be CNC, Laser, or a combination of both. With expertise in both technologies and in-house software development, Redt Inc. delivers integrated solutions tailored to a wide range of applications.
📧Email us:
Inquiry: sales@iredt.com
💻Or, reach us via our social media accounts:
📍YouTube: https://www.youtube.com/@RedtInc.
📍Instagram: https://www.instagram.com/magic_engraver
📍Facebook:https://www.facebook.com/MagicEngraver/
![[MAGIC-JANUS] Deep Laser Engraving + Shiny Scribing Marking + Clean CNC CuttingALL-IN-ONE | TOTAL JEWELRY MAKING SOLUTION](https://static.wixstatic.com/media/d9e1bb_603d730780ab46459fe91da513bd4862~mv2.jpg/v1/fill/w_980,h_613,al_c,q_85,usm_0.66_1.00_0.01,enc_avif,quality_auto/d9e1bb_603d730780ab46459fe91da513bd4862~mv2.jpg)
Comments